

For those who are image-creation savvy, I have two things to say:
- The image is an animated gif, which unlike other social networks, Google+ allows.
- I found that with 19 frames, I had to halve the size of the image from 2120x1190px, which is the max for the new Google+ cover image to 1060x565px in order to have an image that loads in a small enough time.
For those of you who would like to know how to design and make an animated gif, then read on. :)
Design
Before you embark on your animated gif, you need to decide what it is about your image that you want to move.
For example, since I'm an author and I wanted to show off my books on my profile cover image, but it would be quite a busy mess if I just plastered the cover image with all the book covers, I decided that I wanted to change which books were showing on my cover image over time. Thus, it's the book covers that move and change on my image. I then decided, given the layout of the cover image, that four fixed positions for the books was a good idea, so I wanted to put four ebook surrounds into those positions in which the book covers could appear. Thus I have four locations which will take each book cover in turn in the different frames of my animation and I had 16 book covers to rotate through.
Once I had my basic design, all I needed to decide then was the rest of the image, like logos, wording, backdrop, all which relate to me personally, so I'll leave you to decide what you want to put in the rest of your image.
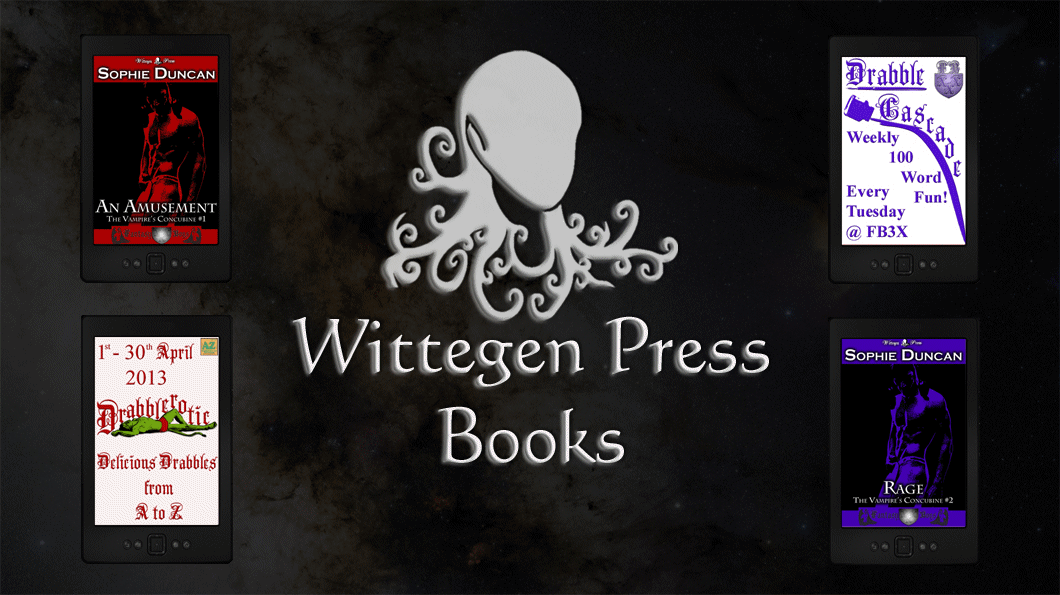
I am going to follow through on my design in the make process. So, in this tutorial, I am going to be creating a shorter version of my book rotating image above, where I use four books to rotate round in the different eBook surrounds.
Make
Design
Before you embark on your animated gif, you need to decide what it is about your image that you want to move.
For example, since I'm an author and I wanted to show off my books on my profile cover image, but it would be quite a busy mess if I just plastered the cover image with all the book covers, I decided that I wanted to change which books were showing on my cover image over time. Thus, it's the book covers that move and change on my image. I then decided, given the layout of the cover image, that four fixed positions for the books was a good idea, so I wanted to put four ebook surrounds into those positions in which the book covers could appear. Thus I have four locations which will take each book cover in turn in the different frames of my animation and I had 16 book covers to rotate through.
Once I had my basic design, all I needed to decide then was the rest of the image, like logos, wording, backdrop, all which relate to me personally, so I'll leave you to decide what you want to put in the rest of your image.
I am going to follow through on my design in the make process. So, in this tutorial, I am going to be creating a shorter version of my book rotating image above, where I use four books to rotate round in the different eBook surrounds.
Make
Firstly, you will need:
- An image editing piece of software (s/w), there are many from Paintshop Pro, through Adobe Photoshop to freeware like GIMP. My one proviso - make it a piece of s/w that can generate different layers, this will make it much easier to generate the individual frames for your animated gif.
- An animated gif creator. Again, there are many, here is a link to a few free ones: http://www.ilovefreesoftware.com/15/featured/best-free-gif-animators-create-animated-gif.html (you can also use movie making s/w, but I won't be going into that here).
Secondly, this is my way of generating a simple animated gif, a handful of simple frames, if you want to generate something more complex, with say 50 or more frames, I would suggest looking at more complex animation s/w, with which I have no experience, so I won't try and offer any advice.
Steps 1 to 4 are done using your image creation software.
Steps 5 and beyond are done using you gif animation software.
Step 1: Generate the background.
This is everything that appears behind the books, in the case of the book animation, that is the star field, the logo and the text. These can all be on one layer if you want, or you can add effects to each item yourself. For completeness I'll go through how I generated my background, but you can do it any way you want to.
The way I generated this was to:
The way I generated this was to:
- Create an image with a black background layer 1060 px high by 656px wide.
- Put the star field in front of that as a separate layer and alter the opacity of the star field to 20%, so it appears very faint. You can do this with any background image you like.
- Add a white logo I already had for Wittegen Press as another layer, set the opacity in this to 80% to take the edge off the white and pillow embossed it to give it some definition.
- Add the text in white, setting the layer opacitiy to the same as the logo layer and also pillow embossing it to match the logo

Step 2: Generate the foreground.
This is all the layers that will be in front of the books, i.e. the four eBook surrounds Each surround is identical and is pasted into the image as a separate layer (see the red ring below).

Step 3: Adding the book images.
Since there are four srrounds, there will be four copies of each of the book images, one to appear in each surround. I suggest naming your layers and being strict with your layer order here, because it will make generating the individual frames for the gifs much easier later.
3a: First add and position four images for each book. Below shows you how to add one set of four images.

2. Paste your book image as a new layer called <Book Name> Bottom Left below the Bottom Left Kindle layer and move it into position behind the surround.

3. Paste your book image as a new layer called <Book Name> Bottom Right below the Bottom Right Kindle layer and move it into position behind the surround.

4. Paste your book image as a new layer called <Book Name> Top Right below the Top Right Kindle layer and move it into position behind the surround.

Repeat for each book and, thus, having done this for four books, you now have sixteen new book layers as shown below:

3b: Rearrange the book layers.
Now that you have sixteen new layers, four behind each ebook surround, you have to change the order of those layers.
1. For the four book layers behind the Top Left Kindle Layer, do nothing.
2. For the four book layers behind the Bottom Left Kindle Layer, move the top book layer so that it becomes the bottom book layer.
 |  |
| From | To |
3. For the four book layers behind the Bottom Right Kindle Layer, move the top two book layers so that they become the bottom two book layers (keep them in the same order relative to each other)
 |  |
| From | To |
4. For the four book layers behind the Top Right Kindle Layer, move the bottom book layer up so that it becomes the top book layer (this is equivalent to moving the top three book layers down).
Thus you now have a different book appearing in each eBook surround.

 |  |
| From | To |
Thus you now have a different book appearing in each eBook surround.

Step 4: Generate the gif frames.
Now you will see there was method to my madness in rearranging the layers, because it makes it much easier to show and hide the layers you want in each image.
4a. Image01
Save a jpg of your composite image with all the layers visible, call it image01.jpg.
4b. Image02
 |
| image01.jpg |
Hide the topmost book layer under each of your surrounds- this will reveal the next book down and effectively looks like the books have all moved round one. Then save a jpg of that image, call it image02.jpg.

 |
| image02.jpg |
4c. Image 03
Leave the layers from step 4b hidden and also hide the next book layer under each of your surrounds. Again, the books should have moved round one position from Step 4b. Then save a jpg of that image, call it image03.jpg.

 |
| image03.jpg |
4b. Image 04
Leave the layers from the previous steps hidden and also hide the next book layer under each of your surrounds. Again, the books should have moved round one position from Step 4c. Then save a jpg of that image, call it image04.jpg.

 |
| image04.jpg |
Step 5: Create your gif.
I am using Animation Shop by Jasc, but most tools have similar processes. I'm not going to be doing anything fancy like adding transitions to the gif, this is literally just glueing the frames together to make a short animation.
First, I'll show you how to generate the animation by adding each frame in turn. Then I'll also show you a quicker way, which a lot of these tools have, where you can batch load your images.
Frame By Frame
1. Start with a blank animation.
Some tools require you to specify size, others go by the first frame loaded. The size should equal the size of the images, in this case, 1060x565px.

2. Add in your first frame, image01.jpg
Select the menu option to add a frame from File, select image01.jpg and it will load as you first frame.

3.Edit your frame properties.
Edit the time the frame will remain visible, setting it to the length you desire, I usually pick about 2 seconds between frame changes for book displays.

4.Repeat steps 2 and 3 for the other 3 images, image02.jpg, image03.jpg. image04.jpg, so that you end up with a four frame animation.

5. Edit the animation properties to ensure it loops.

6. Save your animation as an animated gif.
Batch Loading Images
1: Open the image batch loading tool.
In Animation Shop, this is called Animation Wizard, but many other animation tools have a similar tool and, although the questions may be asked in different orders, they will be similar.
1a: Set Animation looping and frame display time.
These two options may not always be in the same place, but you will need to set both for your group of frames.


1c. Reorder your images if you want to.
 If you've named your images, image01 to image04, your images should appear in the right order, but if they don't, most wizards give you the opportunity to reorder your images, either directly in the wizard, or also in the application itself.
2. Save your animation as an animated gif.
1: Open the image batch loading tool.
In Animation Shop, this is called Animation Wizard, but many other animation tools have a similar tool and, although the questions may be asked in different orders, they will be similar.
1a: Set Animation looping and frame display time.
These two options may not always be in the same place, but you will need to set both for your group of frames.

You will want you animation to repeat.
You will want to set your frame display time to the length of time you want your image to remain static, for book covers, where I want the user to be able to read them, I chose 2 seconds, which is 200 x 1/100th of a second.
1b: Add your images.
Browse to them when asked to by the wizard, select the images and open them into the wizard.


2. Save your animation as an animated gif.
Summary
So that's it really:
So that's it really:
- Decide what you want to move in your image (my recommendation is keep it simple if you are using this ground-up technique with your own elements like book covers).
- Create the different frames for your animation by:
- Creating one backdrop
- Creating foreground surrounds, if you are using them
- Creating the layers for your changing items
- Generate your frames for your gif by:
- Showing/Hiding different layers (this is easier if you have named and ordered your layers logically)
- Save each set of layers as a new image (number your images and keep their names consistent)
- Generate your animated gif by:
- Loading all your frames into your Animation Software
- Setting the looping so that the gif repeats
- Setting the amount of time each frame will be visible
- Saving the animation to gif format
- AND finally, upload your gif to your profile on G+.
I hope this has helped explain the process of generating a simple animated gif.
This is the gif that we created in this tutorial.

This is the gif that we created in this tutorial.
No comments:
Post a Comment
Thanks for stopping by - I'd love to hear from you. :)