Showing posts with label type: recipe. Show all posts

Monday, 4 September 2017

Vegan Ginger Cake

I'm not vegan, but my family and I supported our local flower festival by running the refreshments stall for a day, and we wanted to be able to offer a cake that was vegan friendly (and of course then can also be eaten by anyone with a dairy or egg intolerance/allergy). So, I consulted a vegan friend of mine about converting a ginger cake recipe that has been in my family for years (in fact my sister, Tasha, posted about it a few weeks ago, so it will be mostly familiar to folks who read both our blogs), and I thought I'd share what turned out to be a very successful conversion. The vegan version of the cake tasted the same as the non-vegan version and had the same consistency, which is already a sticky recipe. :)

So here is the Duncan recipe for ginger cake converted to be suitable for vegans (I've made it clear what has been changed in the recipe list):
Yes, this is a picture of the non-vegan ginger cake, but they look identical and I forgot to take a piccie before the vegan one got eaten. ;P

Vegan Ginger Cake

Equipment

1 large saucepan
1 small (milk) saucepan
1 bowl
scales
spatula
2 2lb loaf tins (approx 21x11x7cm | 8x4x3inches)
loaf tin liners or grease proof paper or baking parchment
small hand whisk or fork

Ingredients

8oz | 230g | 2/3 cup Black Treacle (Molasses)
8oz | 230g | 1 cup Soft Non-Dairy Baking Spread (this could be butter in the original recipe, but we've always used baking spread, which is lighter)
8oz | 230g | 1 1/4 cup Dark Brown Sugar
1 tbsp Golden Syrup
1/2 pt (UK) | 285ml | 1 1/3 cup soya milk (or other non-dairy equivalent) (original recipe was plain old cow's milk)
1/2 tspn Bicarbonate of Soda (Baking Soda)
12oz | 340g | 2 3/4 cup self-raising (rising) flour
4 tbsp ginger (yes that really is table spoons not teaspoons)
2 tspn cinnamon
½ banana (this was one large egg in the original recipe)

Instructions

1. Preheat the oven to 150C | 300F | Gas Mark 2.
2. Put the loaf tin liners in the loaf tins or line the tins with you lining of choice. (You really don't want to try and get this cake out of an unlined tin - it is very soft and moist ;)).
3. Put the treacle, soft spread, brown sugar and syrup into the large saucepan.
4. Heat gently until these all melt together, stirring at times to make sure it all mixes.
5. Measure out the flour, ginger and cinnamon into a bowl and put aside for later.
6. Mash the banana and put it with the soya milk into the small saucepan and beat the banana into the milk using a small hand whisk or a fork.
7. Add the flour, ginger and cinnamon to the treacle mixture in the saucepan and stir together.
8. Stir gently in circles to mix in flour then beat vigorously until all the lumps are gone.
9. Heat the soya milk/banana mixture gently to blood temperature (easiest way to measure is to stick your little finger in every now and then and when it feels like it isn't cold it's at the right temperature :)).
10. Add the bicarb to the soya milk mixture and stir.
11. Add the soya milk mixture to the treacle mixture and stir together.
12. Stir as quickly as you can, but take it easy. (There will be bubbles showing as the bicarb activates)
13. Pour the cake batter into the two loaf tins.
14. Put the cakes in the oven and bake for 45 mins - 1hr (stick a skewer into the middle of the cake to check it is done, if not let it cook a little longer).
15. Take out of the oven and allow to cool in the tins until cool enough to handle, then turn out onto a wire cake rack to finish cooling.

Friday, 2 September 2016

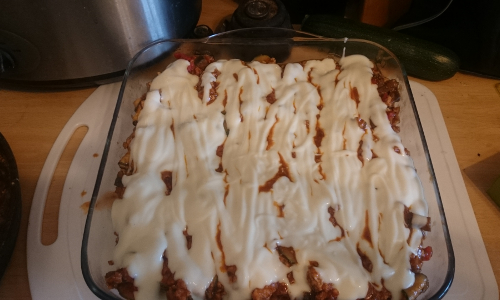
Recipe: Creamy Lasagne


Creamy Lasagne
So, I had to make a lasagne last week and this is what I came up with. My family liked it, so I thought I'd share it with everyone. :)

This recipe makes a large Lasagne of 27x27x5cm, feeds 6-8.

Ingredients
Red Sauce

  • Oil for frying
  • 2 small, or 1 large onion (I used red onion, but you can use whichever onion you prefer)
  •  680g of turkey breast mince
  •  2 beef stock cubes
  • 500g (1 pack) passata
  • 2 large field mushrooms
  • 2 small roasted red peppers
  • 1 courgette
  • 3 crushed cloves/(tspns) garlic (paste) – keep 1 helping separate
  • 1 tspn oregano
  •  A dash of chilli paste
  •  2 tblspns of sweet sherry

White Sauce

I like this shop variety creamy lasagne sauce, of which I purchased 1180g. Yes, I know it's cheating, but I really like it.

However, if you want to make your own, it's just a matter of making a white sauce with butter, flour and milk. Sorry, I have no idea about quantities, except that it's about 1:1 butter to flour.

Lasagne Compilation

  • ~15 Lasagne Sheets - the exact number depends on the shape of your lasagne dish
  • 75g Mozzarella (grated)
  • 75g Cheddar (grated)


Equipment

  • Frying pan and fish slice
  • 1 large lasagne dish 27x27x5cm, or several small ones
  • Knife and chopping board
  • Small bowl for setting aside ingredients
  • Measuring jug and small measures
  • Spoon
  • Mandolin (for slicing the courgette), but you can use a knife if you don’t have one


Preparation
Red Sauce

  • Chop the mushroom in bite size pieces and fry on a low heat in a little oil with 2 cloves/tsps of garlic until mushrooms begin to soften, then put in a bowl and leave to the side.
  • While the mushroom is cooking, chop the onion finely and then, in the same unwashed pan that you cooked the mushrooms in, fry over a low heat until soft and translucent

  • Return the mushrooms to the pan and cook for 2 mins
  • Add the turkey mince and cook on medium to high heat until it all goes beige, i.e. it’s cooked through
  • Add the stock cubes to approx. 100ml of cold water and dissolve, then add this to the pan, stirring in and cooking through for a couple of minutes.
  • Chop the red peppers finely. Now you can go about roasting red peppers if you want, but I found a great cheat, buying them in a jar in brine.
  • Add the oregano, remaining garlic, chopped red pepper, passata, a dash of chilli paste to your taste, and the sherry
  • Cook on a medium to high heat for about ten minutes and then taste: add more of the herbs or spices as you see fit.
  • Leave the sauce to reduce on a low heat, and meanwhile, slice the courgette finely and fry in a little oil until it begins to colour (this may sound like a faff, and if you’re like me and only have a little second frying pan, you might have to do it in batches, but OMG, it adds flavour)
  • Add the courgette to the red sauce and cook for a minute or two


Compiling the Lasagne

  • Start by covering the bottom of the dish with lasagne sheets (break one up to fill in the gaps that will undoubtedly be left), I used 4 and a half sheets
  • Put in a layer of half the red sauce about 1cm thick to cover the pasta sheets

  • Put on a layer of white sauce to cover the red, this should be about ⅓ of the white sauce
  • Repeat steps 1 to 3, this should use up all your red sauce.
  • Put on a final layer of lasagne sheets, I used 6 on this layer, because
    • My lasagne dish gets slightly bigger towards the top
    • I filled in the gaps more thoroughly on the last layer, because I like a bit of extra pasta in the top layer
  • Add a final layer of white sauce covering the entire top
  • Sprinkle with the two cheeses
N.B. My family loves creamy lasagne, so this is heavy on the white sauce. If you prefer it tangier, then just reduce the amount of white sauce, perhaps leave out the second layer of white sauce and just put it over the final layer of pasta.


Cooking
Bake the lasagne in a pre-heated oven (160°C Fan) for 30-40mins, until the top is golden and the lasagne is bubbling.

And finally...
This is a very large lasagne, it will feed 6-8 people depending on what you are serving it with, but it also freezes well. I wait until the lasagne has gone cold and then divide it into portions to suit family size, put it into takeaway containers and then freeze. Just defrost and reheat in the oven, or microwave and it is great (I personally love twice baked lasagne :))

So, I hope you enjoy this recipe. Let me know how it turns out it you make it.

Sunday, 26 July 2015

Recipe: Mini Rosemary & Cheddar Cheese Scones

So, yesterday, I found myself watching repeats of the Great British Bakeoff, and, well, let's just say that I was inspired to do a little baking. So, I decided to make scones, which, for anyone who doesn't know, are a stalwart of English Cream Teas in their sweet form, and appear on lots of canapés' trays in their savoury form.

I went for a savoury scone, mixing a classic combination of strong English Cheddar cheese and rosemary, and I decided to make them bite-size, because I've never made scones before and I thought they'd be easier to manage. So, without further ado, here's the recipe with my tweaks.

My Scones :)


Ingredients

  • 250g Self-raising white flour and a little extra for dusting
  • 1 pinch of salt
  • 1 pinch of cayenne pepper (I made this addition to the recipe based on the fact that the cayenne lifts the flavour of the cheese and complements the rosemary - vary the amount to your taste depending on how much spice you like)
  • 1tbsp rosemary
  • 150g strong white cheddar (grated)
  • 200ml milk (more or less to make the dough soft)
  • 1 egg, beaten


Method

  • Pre-heat the oven to 220 degrees centigrade
  • Sift the flour, salt, cayenne and rosemary into a bowl
  • Mix in 100g of the grated cheese
  • Pour in the milk a bit at a time, mixing until you have a soft dough (you may not need all the milk, or a little more)
  • Turn out the dough onto a floured surface and roll out to about 1cm thick
  • Using a 3.5 cm cutter, cut out the mini scones and place on parchment paper on baking sheets
  • Brush each with the beaten egg on top (don't drip it down the sides of the scones, this will impede an even rise in the oven - that's straight out of Paul Hollywood's mouth from Bakeoff)
  • Sprinkle over the remainder of the cheese
  • Cook in the oven for 10 min until golden brown and risen.
  • Leave to cool on a wire rack
So, I did leave these to cool on the rack, but none of my family could resist trying them warm from the oven and they were an irresistible bite, so much so that, since it was tea time, half the batch is now gone ;). They were also very tasty cold later as a supper bite.

Friday, 26 June 2015

Recipe: Bagels

Anyone who has been following my blog knows that in the last few months I have taken up baking. I have progressed from plain white bread to caramelized onion and cheese swirled loaf, which I have subsequently turned into a tear and share style bread tray as well. Then I used the same basic white bread recipe, flipping the type of flour to a malted flour and adding raisins to make a malted loaf which was great toasted with jam, or just butter if you're my twin sister, who soaked a slice in more butter than I ever thought possible! ;P

I even managed English muffins last week  - no piccies though, I got too excited about the griddling and forgot :(.

Anyway, so today I decided to try something completely new to me (and I remembered to take some pictures). I made bagels!

They may not be the prettiest bagels ever, but they were fun to
make and they taste lovely :)

I started with a couple of different recipes, both from BBC Good Food, and then I tweaked, because I can never leave well enough alone. So I'm telling you what I did and if you want the original recipes, they are here, and here.

I made 12 bagels with this recipe because I upped the amount of ingredients from the original recipe.

Ingredients:
500g     Strong White Bread Flour
3 tbsp   Sugar (I used caster)
2 tsp     Salt (note this is teaspoons, NOT tablespoons)
9g         Dried yeast (the original recipe said 7, but I used more flour)
1 tsp     Bicarbonate of Soda (for the water you boil the bagels in)
300ml  Tepid Water (approx - you may need a little more, or a little less)
1 egg for egg washing the bagels.
Sunflower oil for kneading and lining baking trays.

Equipment:
A kneading board, or sideboard
A large mixing bowl
2 baking trays
A large saucepan
A knife
Scales
A pastry brush
A vented fish slice or slotted spoon
2 cooling racks

Method:

  • I made the dough the same way I make any standard bread dough, I put the flour in a bowl, put the sugar and salt on one side of the bowl and the yeast on the other (the salt will kill the yeast if you put them together when neat) and then mixed the dry ingredients through. Then I began to add the water bit by bit, mixing with my fingers, until all the ingredients came together into a dough that shouldn't be sticky, but should be well combined.
  • Knead the dough on an oiled surface for 10 mins, or until it is smooth and stretchy. Form it into a rough ball.
  • Oil the mixing bowl. Place the dough into it and cover with oiled clingfilm (and a tea towel if you want). Leave to prove for an hour, or until the dough has doubled in size. I turn on my oven to its lowest temperature, leave the door open and put the bowl in front of the open oven.
  • Once the dough has proved, knock it back (give it a little knead just to remove most of the air, four or five kneads should do it).
  • Divide the dough into 12 bits - for me, each was about 80g. Keep the divided dough covered by the clingfilm as you work on each bit to stop it drying out.
  • Roll each bit into a ball, make a hole through the centre and then, put through it the handle of a wooden spoon (or your finger if you're feeling brave). Swing the dough around your chosen pivot until the hole is about 3cm in size (yes I did lose one when I tried this, luckily it sailed across the table and landed on the oiled clingfilm, so I could rescue it). Then place the shaped bagel onto it's greased baking tray (I had six bagels per tray). Remember to leave enough room around each bagel for it to grow in size.
  • Cover the bagels with oiled clingfilm again and leave them to prove for a second time for 30-40 minutes.
  • While the bagels are proving, fill a large saucepan with water and bring it to the boil.
  • Add the bicarbonate of soda - this apparently 'alkalises' the water *shrug*
  • Once the dough has proved for a second time, comes the part that made me blink when I read it in the recipe - boiling the bagels! This is what gives a bagel its unique texture.
  • If your pan is big enough, you can boil 2, or even 3 bagels at a time, I had to do one at a time, because my saucepan circumference to bagel ratio was not big enough and also, I had enough trouble keeping track of one boiling piece of dough ;P.
Yes, you really boil the dough!
  • Place the bagel into the water and boil for a minute, turning halfway through - you can boil for longer if you want a chewier bagel, but 1 minute was just dandy for my bagels. The bagel will swell a little bit and get a skin. Lift the bagel our with a slotted spoon, or a vented fish slice works too.
  • Drain on a rack and then place back onto the baking trays.
  • Brush with the beaten egg.
  • Place the bagels into an oven at 220C conventional oven, 200C fan oven for 20 to 25 minutes (until they are golden brown and give a hollow sound when you knock on the bottom).
  • Leave to cool on a rack (or if you're impatient like me, they taste really nice warm as well).
And that was it - pretty easy once I got over the whole dunking bread dough in water idea :)

Sunday, 3 May 2015

Mature Cheddar & Caramelised Onion Swirl Bread Recipe (This is heaven on a plate!)

I've been keeping myself busy this weekend, and one of the things I've been doing is baking. A friend, Paul, gave me this recipe for mature cheddar cheese and caramelised onion bread, and it is about the tastiest bread I have ever eaten :). So, I thought I'd share how to make it.


Ingredients:

Bread Mix:
500g Strong Bread Flour
2 tsp Salt
12g Fast Acting Dried Yeast (approx 2 sachets)
40g Softened Butter
200ml Tepid Water (approx - you may need a little more, or a little less)
Olive oil (for kneading and non-sticking)

Filling:
200g Mature Cheddar
1 Red Onion
1 tsp of Balsamic Vinegar (the syrup is great)
1/2 tsp of Brown Sugar

Equipment:
A large mixing bowl
A jug for the water
Cling film (plastic wrap)
A tea towel
Baking Tray x2
Baking Parchment if the tray is not silicon.
A knife
A rolling pin

Instructions:

Combing the Dough:
Place the flour, salt and yeast into a bowl, ensuring the yeast and salt do not touch before mixing (the salt will kill the yeast). Break the butter into small knobs and drop into the dry ingredients, mixing them all up with your hands until everything is distributed through the flour evenly. Then begin adding the water a little at a time, combining all the ingredients into a soft, but not sticky dough. If you add a little too much water, just add a smidgen more flour.

Kneading the Dough:
Once the dough is formed, spread a teaspoon of olive oil on your kneading surface with your hand, then take the dough and place it down on the surface. Fold it over and turn 45 degrees, repeat another three times so the dough is very lightly coated in the oil and then begin to knead the dough until the gluten has developed properly and you have a springy dough (about 5-10 mins). Of course, if you have a mixer with a dough hook, you can leave it to do your kneading for you (about 5 mins again). 

Prove #1:
Fold the edges of the dough under and pat it round with your hands to form a ball. Then oil your mixing bowl and place the dough into it. Oil a piece of cling film and place over the top of the bowl, sealing it. Place a tea towel over the top of this and then leave in a warm place for 1 hour (or until the dough has doubled in size, which can take slightly more, or less time depending on the warmth of your proving place). I turn my oven on low (60 degrees centigrade) and leave my bread dough in front of it with the door open.

Preparing The Filling:
While your dough is proving, chop your onion very finely. Place a teaspoon of olive oil into a frying pan over a low heat and add the onions. Sweat them down for 20 - 30 mins, until they are translucent and soft and their natural sugars have been released. Then add the balsamic vinegar and the brown sugar, stirring them in and cooking for another 5-10 minutes. Leave them to cool.

Grate the cheddar and put aside a little for garnish.

Shaping the Bread and Prove #2:
Once the dough has doubled in size, take it back to the kneading surface. Roll out the dough using your rolling pin, into a rectangle. The exact length is up to you, and will depend on the size of your baking tray, but finish rolling the dough with the longest side at right angles to you. Scatter the cheese and onion evenly over the rectangle. Then, beginning with the side nearest you, curl the dough over and roll it away from you until you have a bread swirl (like a swiss roll), finishing with the open edge underneath the bread. Turn each end under and lift the bread onto your baking sheet. Cover with the cling film and the tea towel and put back into your warm place to prove for another hour, or until the dough has doubled in size.

Baking the Bread:
Place an old baking tray at the bottom of your oven (I stand mine on a cooling rack) and preheat the oven to 180 degrees centigrade. 

Once your dough has doubled in size, remove the cling film and, taking a sharp knife, make shallow diagonal slices over the top of the bread. Then sprinkle on the cheese you kept aside for garnishing.

Pour cold water into the tray at the bottom of the oven (this generates steam and helps with the crust of the bread), and then place the bread into the oven. Cook for 30 minutes (or until golden). You can check the bread is done by lifting it and tapping the underside. if it sounds hollow, the bread is ready.

Serving Suggestion:
This bread is best served warm, but you can cool and then reheat, or even toast it later. Try it with a cheese board, or olive oil and balsamic vinegar dips for a great starter, or just a snack.


Yes, I know, I had a bit of an air gap in my swirl
- that's because I didn't let the onions cool down!
The bread still tasted fantastic though :)
Mixing It Up

I used a standard white bread recipe for the dough, but, as they say, variety is the spice of life, and the strong flavours from the cheese and onion, I think, could take a different type of dough, rye, or spelt. Also, you don't have to caramelise the onion first if you don't want to, just make sure it is finely chopped. And, if you don't like cheddar, why not try a different cheese, or another filling, I might try garlic and herb soon.

If you do try out this recipe, or tweak it, I'd love to hear about your results.

Friday, 27 March 2015

Recipe: Dark, White & Milk Chocolate Easter Egg Nests (fun and easy for you and the kids)

This recipe is a little twist on the classic rice crispies cakes, only they are made with Shredded Wheat to make them look more like nests (you can substitute rice cripsies or cornflakes if you want).

It's quick and easy and fun to make with kids, although you can also make them just for yourself too! :)

This recipe makes 25 Easter Egg Nests.


Ingredients:
300g dark chocolate
150g white chocolate
9 Shredded Wheat (or enough rice crispies/cornflakes to use up all the dark chocolate)
50 mini eggs of your choice (I used Cadbury's)

You'll also need 25 bun cases to hold the nests.

Instructions:

In a large bowl melt the dark chocolate. You can do this by putting the bowl over boiling water, or by placing it in the microwave on medium power (1 or 2 mins first and then bursts of 10s until the chocolate is smooth and runny).

Crumble in the Shredded Wheat, mixing until it is thoroughly covered in the chocolate.

Put two teaspoons of the mixture into each bun case, forming into a pattie, and make a dent in the middle of the pattie (I used two teaspoons to shape the nests).

Leave the nest to set for ~30 mins.

Melt the white chocolate in a small bowl - again, you can put your bowl over boiling water, or place it in the microwave.

Place a teaspoon of the white chocolate into the centre of each nest and immediately add two mini eggs to each nest.

Leave to set for another 30 mins and they're ready to eat!

Friday, 10 October 2014

Recipe (great for Halloween treats): Maple Syrup & Dark Chocolate Cookies

Recently, a lovely friend of ours, who came visiting with her daughter from Canada, brought us some lovely maple syrup biscuits. Needless to say, they didn't last all that long! Well, I love maple syrup, so I decided to go searching on the web for a maple syrup cookie recipe that I could try making. I found loads :). I also have a penchant for chocolate chip cookies as well, so I decided to combine both my loves into one cookie. And below is the result. These are lovely on a chilly evening with )if you're a Brit anyway) a nice cup of tea - they'd also make great treats for a Halloween part (bat-dropping cookie anyone? ;P).

Maple Syrup & Dark Chocolate Cookies

Soo, in case you want to make these rather yummy cookies, here's my recipe, it makes 60 cookies of about 2.5 inches round:

Ingredients:

  • 1 cup / 227g / 8oz butter or baking spread, softened at room temp
  • 1 cup / 227g / 8oz caster sugar (US granulated sugar is fine) - if you want an even richer flavour, use brown sugar instead
  • 1 large egg
  • 1 cup / 237ml pure maple syrup (no getting the blended stuff)
  • 1 teaspoon vanilla extract
  • 4 cups / 908g / 32oz self-raising flour (if using all purpose flour then add 2 teaspoons of baking soda)
  • 1/2 teaspoon salt
  • 1 cup / 200g / 8oz dark chocolate chips (optional, but I like chocolate) 

Directions:

  1. Preheat oven to 175 degrees C / 350 degrees F & grease your cookie sheets (if you're like me an have a small oven, you will have make more than one batch (3 for me), so you'll be washing and re-greasing your sheets several times)
  2. In a large bowl, cream together the butter and sugar (I used an electric whisk for this, you can do it by hand it you want to build up your arm muscles, or put it in your mixer)
  3. Add the egg, maple syrup and vanilla extract and mix until you have a light brown, soft and airy paste (it will be quite sloppy at this point it needs to be to take all that flour)
  4. Sift the flour and salt (and baking soda if you need it) into the bowl and also add the chocolate chips if your're using them. Stir until all the flour is blended in.
  5. Using a teaspoon take a heaped spoonful of the mixture and place onto your baking sheet, repeat this procedure leaving 1/2 an inch or so between cookies to allow for spread - see image below.
  6. Bake for 10 - 15 minutes, or until golden brown (depends on your oven).
  7. When you get the cookies out of the oven, leave them on the sheet for a couple of minutes, this allows them to harden a little so you don't squidge them out of shape when getting them off the sheet. Then, using a fish slice, lift each cookie onto a wire rack to cool.
Laying out cookie mixture on baking sheet
~

Something else you might like for Halloween, my 5-star ghost story, The Burning Web.

The Burning Web by Sophie Duncan
Is it symptoms left from his brain haemorrhage, or a guilty conscience that is making Tristan McCall see things no-one else can?

Forced out of the police by scandal and illness, Tris is trying to rebuild his life through the renovation of the home he hopes to share with Xander, his husband. A sprawling Gothic pile, Berwick House is in need of attention, but Tris soon realises the attention is not all one way. Faced with a presence in the house only he can sense, Tris must decide if his damaged brain is playing tricks on him, or if Berwick House really holds a dark and dangerous message from beyond the grave.

Friday, 6 June 2014

Lemon & Orange Cake Pops - I am feeling just a little bit accomplished

I'm no baker, I leave that to my sis, Tash, mostly, but I have achieved my first ever batch of cake pops! :D They aren't perfect, I think I'm going to have to practice rolling them in icing and sprinkles to get a more even coverage, but they taste good, even if I do say so myself :).

For anyone who is interested - this is how I made them:

Equipment:
cake pop tin/mould
mixing bowl
electric hand mixer (or elbow grease, it's up to you)
cake pop sticks
cooling rack
scales

Ingredients:
cake mix:
113g/4oz self-raising flour
113g/4oz margarine/butter
113g/4oz caster sugar
3 eggs
1 tsp lemon flavouring

icing:
icing sugar (as much as needed, see recipe)
lemon flavouring (or whatever you prefer)
orange flavouring (as above)
colouring (I used natural orange, since that was my flavouring)

sprinkles - pick what you like, as long as they are small

Making the cake pops:
This is an all in one bowl recipe. In a bowl, use the mixer to cream the butter and caster sugar together until smooth and the mixture goes paler. Add the eggs and lemon flavouring and whisk together until smooth. Fold in the flour.

Grease the cake pop moulds and fill the bottom mould until it is heaped with mixture and then place the top mould on, sealing down. Place in an oven pre-heated to 180C for twenty minutes, or until a cocktail stick comes out of a pop cleanly. Leave to cool and then carefully extract from the moulds. I found I had some cake bleeding out the sides of the cake pop shapes, but this was easily trimmed and added to this cook's waistline as I went :)

Making the icing:
When the pops are cool and firmed up, make your icing. Lots of people use chocolate, but I decided to use a simple water-based flavoured icing and lots of sprinkles. I took icing sugar, about 5 - 8 tablespoons (this was chuck it in a bowl time, I wasn't measuring and I ended up making two lots of icing to cover all the pops). I added a couple of capfuls of each flavouring and colouring as needed to get the shade I wanted and then enough water to make a sloppy paste, the consistency of dipping batter.

Decorating the pops:
I took each pop, rolled it around in the bowl of icing until it was fully covered, then rolled it in a bowl of my chosen sprinkles until ample coverage was achieved - pretty much the same technique I used with egg and breadcrumbs when I'm coating fish. I then left them on the cooling rack to being to harden.

P.S. Only once the pops were partially hardened did I put them on their sticks since when I tried this before decorating, much hilarity and cake pop skewers were the result! ;P I then let them harden completely and put them in a cup cake box for delivery to the party I'm attending.

P.P.S Make more cake pops than you need, because there will be casualties :)

P.P.P.S I did try with thicker icing that I pasted on, but the result was something that looked like it was the incredible melting pop ;P